Affichage des articles dont le libellé est Finger Food. Afficher tous les articles

dimanche, septembre 29, 2013

Hoummous

Hoummous


The first chickpeas I "mashed" probably were the kacang puteh ones back in Kong Chian cinema during those days when I was a kid. A few decades later fancy me being known in close circles for my humble Hoummous and friends have even rejected watered-down versions being sold in popular bazaars by so-called hoummous experts, insisting that I provide them with my recipe so that they would know how to make it even after they (or I) have left whichever city we were friends in.

Many years ago I've blogged about a beetroot version and this should precede it, but for some reason I've never blogged about the classic version. So I'm setting things right today and this could then go into my archives for whoever would be looking for my take on the hoummous.

Hoummous : 

460g canned chickpeas
1-2 tbsp tahini (cold-pressed sesame paste)
1 tbsp dry-roasted cumin seeds
juice of 1 lemon (and adjusted according to taste)
4-6 tbsp olive oil (and extra for garnishing)
3 garlic cloves (grilled)
salt to taste

ground paprika and a few whole chickpeas for garnishing

Drain the water from the can and immerse the chickpeas in a bowl of hot salted water.

Dry roast the cumin seeds in a frying pan with the garlic (roughly chopped) and when fragrant add in some olive oil.

Remove the chickpeas from the hot water and add them plus the cumin and garlic to a blender. Add olive oil, lemon juice and tahini and blend to a roughly fine paste. Add salt to taste and if necessary a little water and/or olive oil if the paste is too dry.

Pour the paste into a pretty recipient and make a well. If not consuming immediately, cover with cling wrap and refrigerate. (Actually the dish is best served chilled.)

Just before serving, pour a little olive oil into the well and add a few chickpeas for decoration. Sprinkle some ground paprika over everything and serve the hoummous with fresh vegetable sticks or corn chips.

jeudi, juin 23, 2011

Fried Thai Prawn Cakes (Tod Mun Goong) with Sweet Chilli Dip


Thai Prawn Cakes with Sweet Chilli Dip

We have been eating fried prawn cakes at the Thai restaurant in our compound that cost a good 10 euros for 4 pieces which considering that we are in China seemed a lot of money. Hub had a guest over for dinner last night and wanted me to cook a Thai meal. I thought hard about what to make for the aperitif and finally decided to try making a few Fried Thai Prawn Cakes with Sweet Chilli Dip.

I bought 500g of good-quality frozen prawns for 50rmb. That yielded 10 prawn cakes. Moral of the story : prawn cakes are expensive to make.

I have been extremely busy as 6 members of my family came over to Shanghai 2 weeks ago. Only my parents are still staying with me now, but we have to prepare for our short trip to Jiangmen in a few days and there are still many odds and ends to tie up before we leave. The weather had also been extremely bad, it rained almost every day since they were here.

We now have a bathroom that has had its floor ripped up to be water-proofed and a toilet is waiting for a new paint job once they have part of the roof repaired. Not funny when you had 11 people under your roof and needed all the bathrooms you could come up with.

Thai Prawn Cakes :

500g raw prawns
1/2 tsp salt
1/2 tsp white pepper
1 tbsp fish sauce
1 tbsp sugar
juice of half a lime
white of 1 small egg
1 tbsp corn starch
panko breadcrumbs
oil for deep frying

Sweet Chilli Dip :

2 tbsp water
2 tbsp fish sauce
50ml white rice vinegar
100g sugar
2 garlic cloves
1 large fresh red chilli

Peel and devein the prawns. Add salt, pepper, fish sauce, sugar, lime juice, egg white and corn starch and mix into a rough paste using an electric mixer. Chill in the fridge for at least an hour.


Pound the garlic and chilli till you get a rough paste, add it to the water, fish sauce, sugar and vinegar in a small pot and simmer/stir till you get a syrupy sauce. Set aside to cool.


Heat up enough oil for deep frying in a frying pan. Fill a shallow dish with panko breadcrumbs. Scoop up a tablespoonful of the prawn paste and drop it onto the breadcrumbs. Coat it thoroughly and shape it with your hands if necessary. Gently lower the prawn cake into the hot oil and fry till golden brown and crispy.

Serve hot with fresh cucumbers and the sweet chilli dip.

mardi, mai 10, 2011

Basic Pork Won Tons (云吞)


云吞

I have been asked by a number of non-Asian friends how one makes won tons and realised that it was one of those things that appears complicated to people who hadn't spent a part of their lives eating wrapping them.

Since I regularly make Pork Won Tons 云吞 for my children (the Babies do not eat seafood), I have taken the opportunity to take a few pictures during my last dumpling-making session.

When I said basic, I really meant basic. No coriander, onion, ginger, garlic or water chestnut to help improve the fare - though I do use them when the babies are not in the picture. Just fill your dumplings the way you want them.

Both fresh and frozen won ton wrappers are available here in Shanghai and for some reason I have only bought the ones imported from Singapore. Back in Europe, most Chinese grocery stores will carry them - and for some reason too they would usually be imported from Singapore.

Basic Pork Dumplings :

fresh won ton wrappers
minced pork
salt
pepper
dark soy sauce
chinese cooking wine
sesame oil
egg
cornstarch

Dipping sauce :

fresh bird's eye chilli
light soy sauce
dark chinese vinegar

I always prepare the filling at least a few hours in advance so that it has the time to absorb all of its seasonings. It is also easier to wrap this way.

Marinate the minced pork with the salt, pepper, soy sauce, wine and sesame oil. Mix well.

The filling

Make a well in the meat and break an egg into it. Stir with a pair of chopsticks to mix it well. Mix in the cornstarch (about 2 tsp for 250g of meat). Cover the bowl with clingwrap and leave in the fridge for a few hours.

Won ton wrappers

I only use cold water to seal my won ton wrappers as they are usually well-floured. What is important is not to put in too much filling, and to use your fingers to press out any air pockets so that the won ton doesn't burst/tear during the cooking. This applies to making raviolis and tortellonis too, for example.


Basically put a small spoonful of the filling in the middle of the wrapper. Dip one finger in a bowl of cold water and wet 2 sides of the wrapper so that it could be folded and firmly sealed into a triangle or rectangle. Other shapes could of course be used, I usually stick to triangles especially when I fry my won tons because I prefer to shallow-fry.

relatively calm surface


If boiling them, bring a pot of lightly salted water to boil, then lower the heat to medium. Place a few won tons into the water at a time so that they do not stick together. I use medium heat so that the wrapper will not break and the meat will have the time to be cooked through.


The won tons are usually ready when they start to float and the skins turn transparent. Fish them out and set aside. One can eat them just like that with a dipping sauce, use them in a soup or accompany them with noodles. For some reason my children adore them.

mercredi, novembre 17, 2010

Asparagus and Porcini Won Tons


Asparagus and Porcini Won Tons

I wish I had been minimalist, fan of Starck etc. Have been spending hours and hours sorting through the clothes, toys, food etc and dozens of bags (big rubbish bin-sized) later, I've only touched the tip of the iceberg. We move in a few weeks and I'm still not ready. How in the world did I manage to accumulate so much?

We've given notice for the house (though we've not found a new one); I've given away at least half of my furniture (though I have no idea what we would need in the new house); I have a moving date (though we haven't found the movers yet); and Hub will start in his new job in January (though he has yet to sign the new contract and we cannot apply for our visas as such)...This is one of the craziest moves we've ever made and you may know that we've moved quite a bit in the past decade.


Anyway, while waiting for everything to come into place, life goes on. I haven't been able to blog much about food, but I've been cooking. I have a WW3 food stock to clear, remember? Since it turns dark early nowadays, I haven't been able to photograph the food and I've been running around so much, blogging is a little far from the mind. Besides, we've also been travelling almost every weekend. Last weekend it was Zurich and the coming one will be to Montepulciano (Tuscany). And we'll be driving there in a Ferrari (California)!

Just poached

Found the last fresh funghi porcini around and decided to cook it simply, wrapped in won ton wrappers with a bit of cooked asparagus and gently poached in a porcini bouillon. Must remember to squeeze out the air pockets as you wrap them, and poach them quickly in lightly boiling water or they'll come apart if too cooked. Had them for lunch : one plate with just a bit of aged balsamic vinegar, and the other with a light soy-sugar-dry sherry-old vinegar dip.

dimanche, octobre 03, 2010

Baked Lemon Soy Chicken Wings


Baked Lemon Soy Chicken Wings

Most Tuesdays, the Teenager sees a Feuerstein therapist after school and I usually have an hour to kill somewhere in Spezzano. Just enough time for a spot of grocery shopping in a nearby supermarket. Only problem is that one has to bring along the Babies - a sure way to increase your budget substantially.

"Mummy, can I (please) have this?" rings out like a spoilt record every few minutes and if you were not vigilant enough you may find, as you check out, things that you do not remember having put into your basket.

The last time, Babinou asked if we couldn't have chicken wings please, mummy? I am quite careful nowadays about the meat I buy, so I usually only buy from certain supermarkets and butchers and this supermarket isn't one of them. But chicken wings somehow are acceptable even if they were not free-range so I bought 2 dozens of them and prepared Baked Lemon Soy Chicken Wings for my kids.

Nothing special about them. Had leftover Lemon sauce from another meal and just combined it with light and dark soy sauce and a bit of dry sherry to make a marinade for the wings.

jeudi, septembre 16, 2010

Bruschetta and Tomato Tart


Tomato Tart

I have not read Amy Tan (e.g. "Joy Luck Club") for a number of years and decided all of a sudden to check her out again. Ordered two of her latest books ("Saving Fish from Drowning" and "The Opposite of Fate") one of which is an autobiography of sorts.

I am drawn to her writings because I am "western-educated" like the writer, but we also grew up in Chinese families with mothers who were superstitious and who often felt it necessary to warn us against all the dangers that could befall us if we do or do not do certain things; Mothers who believed in the supernatural and the afterlife; who believed in fate and yet had faith that we (the children) were destined for greater things.

As I was reading Tan, I shudder over her account of the Ouija board that she would use so often to help her mum obtain answers to certain dilemmas in life. To those who have not heard stories about the ouija from their mums, it would just be another board game from the Parker Brothers, but I still remember what mine had told me of the spirits who had been summoned and who wouldn't leave in peace. I am reasonably logical and I believe that everything in life could have a scientific explanation, but I also feel that there is room for the unexplained, my upbringing having planted more than the seed of doubt (in the absolute nature of the former).

Do you believe in premonitions and the afterlife? Tan's story about how her friend Pete dreamt of his own death before it happened was eerie, but unlike Hub who had been brought up to not believe in spirits and in the supernatural and who would without any doubt dismiss it as utter rubbish, I, not for the first time in my life, spent some time wondering about the mysteries of life and how one's belief is so shaped by one's upbringing. I also wonder why we see or at least feel spirits so easily where I came from, but wouldn't even think of it where I'm living in now. The only ghost in these parts as we know is the Holy Ghost.

Hub thinks that seeing is believing, but isn't it also true that if you don't believe you may not see?

Anyway that's what I've been up to lately, finding yet another excuse to not fold the mountain of clothes that I've washed and dried in the past 2 weeks. I read, I muse, I cook and I eat.

I've been having a love affair with something I usually refuse to eat i.e. raw tomatoes. I pick out tomatoes in my salad, I hate tomato ketchup and will only eat tomatoes in the form of home-made tomato sauce. But I love Bruschetta. And after our recent weekend in the Piedmont, I especially love my bruschetta when it's made with freshly baked foccacia.

Once I got started with the olive oil, garlic and herb-marinated tomatoes, I decided to marry them with my beloved puff pastry and so we had Tomato Tart for tea yesterday. Yum yum...


The Tomato Dip/Filling :

500g of ripe cherry tomatoes (halved or quartered according to their size)
good-quality extra virgin olive oil (enough to cover the tomatoes)
2 large garlic cloves (bashed)
fresh rosemary and basil leaves
a pinch of ground black pepper
salt to taste (only just before serving*)

freshly-baked foccacia

Put everything together in a bowl (except the salt - or it'll drain the juice out of the tomatoes) and marinate for a few hours before serving. Cover with clingwrap. Sprinkle in the salt just before serving. Goes really well with freshly toasted country bread or freshly-baked foccacia. I used Buitoni's ready-made foccacia dough and improved it with salt, olive oil and rosemary before baking it in a very hot oven for 10-12 minutes. My guests at my last class lunch seemed to love it.


For the tomato tart, heat the oven to 180°C and bake the puff pastry (bords rolled inwards and dough pricked all over with a fork) for 10 minutes. Remove from the oven and spread the tomato filling (minus the juice) on it. Return to the oven for another 10 minutes. Serve hot.

lundi, août 09, 2010

Bhindi Pakora (Beignets d'Okra)


Bhindi Pakora

Hub likes to tell me to cook vegetables whenever I prepare a meat dish and while I know that I ought do just that, I hate it when people oblige me to to do anything. I hate it even more when he tells me how I should prepare my vegetables. It could of course be his commanding tone that gets on my nerves, let's just say that nobody bosses Lotus around.

He could have said, "Wouldn't it be lovely to have some cauliflower with the curry, my darling?" instead of that suspicious, "Are you not going to cook any vegetable to go with the curry?" Arrgh.

I wonder if it's a sexist thing because in our earlier days together, it always freaked me out that he would take whatever his male friends tell him at face value whereas if I or some other female tell him anything, he'll have this I-must-take-this-with-a-pinch-of-salt expression on his face. Needless to say that I'm not one to take things lying and I've given him a hard time for this. Men are basically very basic creatures. They have to be educated.

Anyway, I made a Beef Curry for dinner and our friend asked his usual question and tried to tell me comme d'habitude what vegetable I should cook and how to go about it. He wanted my Cauliflower Masala and Fried Bhindi. And that was when I decided to make Bhindi Pakora. Voilà. He should count himself lucky to have any vegetable at all.

I almost never order pakoras in Indian restaurants here because they would more often than not contain alot of batter and be very greasy. It's better to make your own (in your own way) in such situations. He enjoyed the Bhindi Pakoras and I expect to be hearing him tell me to make it the next time I make a curry...


Bhindi Pakora :

300g Fresh Lady's Fingers/Okra/Bhindi
1 cup mix of Chickpea and self-raising Wheat Flour (about 2:1)
1 Tbsp Corn starch
1/2 Tsp Bicarbonate of Soda
1 Tbsp Ajwain seeds
1 Garlic clove (minced)
1 Tsp Curry powder
1/2-1 Tsp Chilli powder
1/2 Tsp ground Garam Masala
Salt and Pepper to taste
Cool Water to bind

Oil for deep-frying

Wash and pat dry the okra with kitchen towels. Slice them into bite-sized pieces (e.g. rings).

Make a batter by mixing the rest of the ingredients together, making a well in the centre so that water could be poured in - in batches - to obtain the consistency that you want. Stir well to remove all lumps in the batter.

It may be easier to work with a thicker batter, but I use a spoon to drop my batter into the hot oil, so it doesn't really matter. I prefer my batter light.

Add the sliced okra to the batter and mix well. Using a tablespoon, scoop up a spoonful of the okra-filled batter and drop it into the hot oil. Fry till golden using medium-low heat so that the okra would be cooked, then remove from the oil and drain on paper towels. If you like it crispy (like I do) fry them longer, if not, keep an eye on the cooking. Whatever it is they are best eaten hot.

lundi, juillet 19, 2010

Bak Kwa/Long Yoke (2)


Bak Kwa

Since we're not back in Singapore this year, I've decided to make some Bak Kwa (BBQ Minced Pork Slices) for the children. It was a treat for them coming back always hungry from the pool, and as Hub said, I've even managed to attract the owners' dog with my BBQ meat slices.

Babies at the pool

I've blogged about my Bak Kwa last year and while it wasn't Lim Chee Guan or Bee Cheng Hiang, it wasn't too bad for a home-made attempt. Actually it's really quite easy to make, only difficulty is getting it to feel and taste the way I was used to having it.

The last time, I felt that it wasn't sweet enough. So I've increased the sugar dosage. I've also made the effort to glaze and BBQ the meat slices and the result was immediately much better. I also played with the thickness of the slices, trying both very thin and thicker ones. And I've tried cooking them longer or shorter in time. The conclusion is that you have to do it the way you like it, e.g. the Teenager prefers it harder, the Babies softer etc. I will have to continue experimenting until I find a version that suits everyone, I guess. But this one I'm reasonably happy with at the moment.

Bak Kwa :

The Meat :

500g minced Pork
2 Tbsp Fish sauce
1 Tbsp Dark Soy sauce (preferably made-in-Singapore)
1 Tbsp Kecap Manis
2 Tsp Light Soy sauce
1 Tbsp Chinese cooking wine
1 Tsp 5-spice powder
1 Tsp ground Chilli
1/2 Tsp Salt
1 Tsp ground White pepper
125g Sugar

The Glaze :

2 Tbsp Sugar
2 Tsp Sesame oil
1 Tbsp dry Sherry
2 Tsp Light Soy sauce

Mix all the ingredients with the pork and marinate for a few hours if not overnight.

Pre-heat the oven to 125°C.

Place the marinated meat between 2 large sheets of baking paper and roll it flat with a rolling pin. The thickness is as you desire, very thin = drier and crispier.

Raw and just rolled out

Remove the top piece of baking paper and bake in the oven for 20 minutes. Drain any liquid remaining in the baking tray. Leave the meat to cool and dry out in the open.

"Dried" in the oven

Prepare the BBQ. Cut the meat into smaller slices so that it would be easier to BBQ, turn them over etc. Glaze the meat on both sides with the sugar-sesame oil-sherry-soy mixture.

On the BBQ

It is best eaten hot, but cool it properly before storing in a tupperware and it can easily keep for a few days. Mine didn't keep for long. The cleaning lady came this morning and helped herself to the remaining few slices in the tupperware!

dimanche, juillet 18, 2010

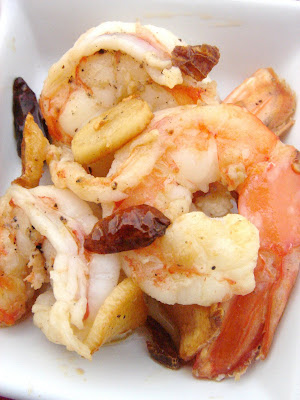
Gambas al Pil Pil (Revisited)


Gambas al Pil Pil

The Sangria had to be eaten with something. I have blogged about my Gambas al Pil Pil many years ago, but even those of you who have been with me right from the beginning would remember - nothing much of it. It was a chore trying to find the recipe among my ramblings, so I've decided to post it again. Especially when it's a short one and makes me happy as I savour the dish again in my mind.

This was a standard tapas dish that we would enjoy in our so many nights out drinking away when we were living in Andalusia. Dinner doesn't usually start till 10pm in Spain and a little before that we could have a drink at the bar and nibble on a few things - or make the tapas our dinner. We only had the Teenager then and he would run around with other children in the restaurant or just outside, usually watched by the old grandpas or grannies chatting away nearby. When you think that I get nagged at by so many French people because my kids do not go to bed before 8pm - they obviously hadn't lived in Spain.

Gambas, clams, sardines, anchovies, squids and so many other fish were easily available where we lived. I never used to like olive oil until Hub started working at Martos - the 1st olive oil producing region in the whole of Spain. We bought top-grade olive oil from the co-operative by the 5-litres and cooked almost everything in it. And the Andalusians sometimes like their food spicy because of the Moorish influence in their culture. What better accompaniment for glass after glass of sangria or tinto de verano than little clay dishes of Gambas al Pil Pil?

In my earlier post, I blogged about the more traditional way of preparing the dish using clay dishes (cazuelas) and baking them in the oven. I've always found that pan-searing the prawns works just as well so that's what I'll blog about today.


Gambas al Pil Pil :

400g of medium Gambas (peeled except for the tails, backs slit and deveined)
Olive Oil
3 Garlic cloves (sliced)
6 Guindillas or dried Bird's Eye Chillies (3 left whole, 3 crushed)
1 Tbsp White Wine
Salt and Pepper to taste
Parsley for garnishing (optional)

In a frying pan heat up a good amount of olive oil and fry the sliced garlic and chillies till fragrant.

Add the gambas and sear them on both sides. Add salt and pepper to taste.

Pour in the white wine and mix well.

Garnish with the parsley and serve hot - preferably with baguette to soak up the (very hot) sauce.

samedi, juillet 10, 2010

Baked Spicy Sardine and Egg Puffs


Baked Spicy Sardine and Egg Puffs

I have been craving for a few Sardine and Egg Puffs though each time I asked the Hub if he wanted them he would say no. He's generally difficult with fish and sardines do tend to sound, smell and taste fishy. Funny enough, each time I made them, he would help himself to a few, but just don't ask him if he wanted them.

For dinner yesterday, I made them without telling him beforehand. I don't eat goat's cheese so at least I could have sardines. I was expecting our guests not to like them (if you offer me herring or tuna or anything but sardine I would freak out), but surprisingly enough they all chose to try one and even liked it!

The sardines I thought contrasted quite nicely with the chopped hard boiled eggs. Make it a little spicy and it gets a little kick as well.


Baked Spicy Sardine and Egg Puffs :

Puff pastry
Ajwain seeds
1 tin of Sardines in Chilli oil (mashed)
1 hard-boiled Egg (chopped)
Half a red Onion (chopped)
1 Bird's eye chilli (crushed)
Lemon juice

Drain the chilli oil into a small frying pan (adding more olive or peanut oil if necessary).

Fry the onion and chilli in it till fragrant.

Turn off the heat and mix in the mashed sardines and egg. Squeeze a bit of lemon juice over it.

Almost the end of the filling

Chill for an hour before filling puff pastry squares with it. I like to add some ajwain seeds to the fresh puff pastry befing adding any filling. Just sprinkle the seeds on top and then press them gently into the pastry.

Bake in a hot 180°C oven for 20 minutes.

vendredi, juillet 09, 2010

Feuilleté de Chèvre et Tomate


Feuilleté de Chèvre et Tomate

I don't ever eat goat's cheese. Though there is no reason why I couldn't make it for my guests. In mozzarella-land we tend to forget this humble cheese that figures largely in many Mediterranean diets, especially in the ones that supposedly prolong your life.


I prepared them simply :

Fresh Puff pastry squares
Fresh Goat's cheese
Fresh Basil leaf
Thinly-sliced fresh Tomato
Fresh Thyme
Salt, Pepper and Olive Oil

20 minutes in a hot 180°C oven.

vendredi, juillet 02, 2010

Chinese-style Pork Ribs


Chinese-style Pork Ribs

SIL has brought a gigantic jar of Foie Gras from her region and we had it for dinner last evening. Hub uncorked a bottle of lovely Loupiac to go with it and we all tried to be merry in spite of the heat, the army of blood-thirsty mosquitoes and the bad news that we should expect to stay longer in Modena than we would like to.

I made a plate of Chinese-style Pork Ribs for everyone to pick on if they should still be hungry. I'm still a little nostalgic about the good Chinese food we had in London and regretful that we hadn't had the chance (and space in the stomach) for some good Indian fare. Maybe next time.

Chinese-style Pork Ribs :

1 Kg Pork Ribs (chopped into manageable portions by your butcher)
2 Tbsp Dry Sherry
White Pepper
2/3 Tsp 5-spice powder
Cornstarch for dusting

2 Tsp toasted Sesame oil
1 Garlic clove (sliced)
1 piece fresh Ginger (sliced)
1-2 Bird's eye chillies

2-3 Tbsp Brown Sugar
2-3 Tbsp Chinese Rice Vinegar
1 Tbsp Dry Sherry
1 Tbsp light Soy Sauce
1 Tbsp Worchestershire Sauce
1 Tsp concentrated Tomato paste
A bit of hot water

Marinate the pork ribs with the sherry, pepper and 5-spice powder for a few hours.

Mix the sugar, vinegar, sherry, soy sauce, worchestershire sauce and tomato paste together.

Heat up enough oil for deep-frying in a wok. Lightly dust the marinated ribs with cornstarch and fry them till they are cook through. Remove and drain on kitchen napkins. Set aside.

Clean the wok and heat up the sesame oil in it. Add the ginger and garlic and fry them till fragrant. Add the chillies and the sauce and heat it in the wok to dissolve the sugar. Taste and adjust the seasoning if necessary.

Return the fried ribs to the wok and coat them well with the sauce. Add a bit of hot water if necessary.

Serve hot with steamed jasmine rice or eat them as finger food.

dimanche, juin 06, 2010

Beetroot Hoummous

Beetroot Hoummous

I saw this Beetroot Hoummous the other day in a French blog C'est moi qui l'ai fait! and decided that I had to try it out. This afternoon's BBQ Lunch was the perfect occasion and I managed to find cooked chick peas and beetroot in the supermarket plus I had a third of a jar of Tahini to finish. Only problem was that 2 supermarkets ran out of Lebanese bread and I was about to make my own when I found 2 last packets in a 3rd one. Whew!

I have adapted the recipe a little to suit me and the result was very pretty and tasty. It was a hit with everyone and I think that from now on this would be my preferred hoummous.

Beetroot Hoummous :

460g cooked Chickpeas
160g cooked Beetroot
4 Tbsp Tahini
1 Tbsp dry roasted Cumin seeds
Juice of 1 Lime and 1 large Lemon
6 Tbsp Olive Oil (and 1 Tbsp extra for garnishing)
3 Garlic cloves (could be grilled)
Salt to taste

ground paprika and a few whole chickpeas for garnishing

Process everything into a fine paste.

Before serving, drizzle more olive oil on top of the hoummous. Serve with pita bread or raw vegetable sticks.

jeudi, juin 03, 2010

Baked Coca Cola Chicken Drumsticks

Baked Coca Cola Chicken Drumsticks
I am more or less shopping a day at a time this week because I need space in my fridge for Sunday's lunch. For dinner this evening, I decided that we would have Baked Coca Cola Chicken Drumsticks - a sure hit with the family. With the change in the weather everyone is feeling a little queasy and Coca Cola having medicinal properties could give us just that little (more psychological than anything) boost. Actually, I love making Coca Cola syrup. And only the original Cola would do, the light and zero versions contain too many chemicals.

To feel less guilty about the soda and sugar, I served the drumsticks on a bed of salad leaves fresh from the neighbouring farm. And finished the meal with loads of fresh cherries and strawberries from another farm. I try to buy whatever fruit and vegetable I can find in the farms near my house when they are in season. Help the local economy and waste less fuel in the process.

Baked Coca Cola Chicken Drumsticks :

The Marinade :

1.5 Kg Chicken drumsticks
Salt and Pepper to taste
Half cup mix of Coca Cola and Red wine

The Coca Cola Syrup :

1 1/2 cup Coca Cola
1 cup Rock Sugar (gives a better glaze)
Juice of 2 large Limes
4-5 African bird's eye Chillies

Marinate the chicken with a bit of salt, black pepper and the cola-red wine mix for about 30 minutes. I wouldn't do more as the salt will drain the juices from the meat.


At the same time heat the oven. I did grill + fan at 250°C.

And prepare the syrup. By adding all the ingredients together in a heavy-bottomed pot and simmering over low-medium heat till you get a syrup. That should take between 20 and 30 minutes.

The syrup

Before putting the chicken into the oven, brush them generously with the Cola syrup. Bake for 10 minutes.

Remove from the oven and brush more Cola syrup over the drumsticks. Bake for another 10 minutes. Watch that they do not burn though.

Remove from the oven and drain any excess liquid into a bowl. Turn the drumsticks over to the other side and brush more Cola syrup over them. Return to the oven for another 10 minutes.

Pour the bowl of liquid into the pot of syrup and simmer it on medium heat on the stove. Reduce as much as you can.

Remove the chicken from the oven and brush them with the syrup. Stop the fan and just use the grill. Bake for another 10 minutes.

Switch off the oven. Drain any excess liquid into the pot and return the chicken to the oven. Leave them there for at least 10 minutes to relax.

Simple Cola Drumsticks
In the meantime reduce the liquid for one last time. Pour the golden Cola syrup over the drumsticks before serving. Whatever syrup that is left over will coat tomorrow's grilled tofu.

PS : You can also braise the chicken in the Cola syrup and finish the cooking in the oven or on the BBQ.

mercredi, juin 02, 2010

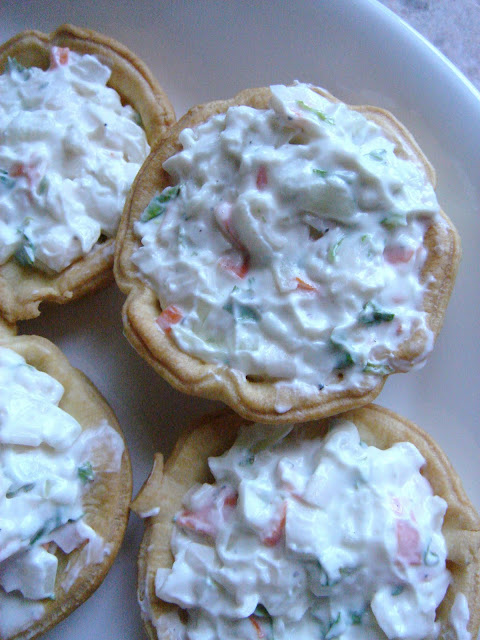
Crab Stick Cream Cheese Tartlets

Crab Stick Cream Cheese Tartlets

GA made a Crab Stick Roll that was so good it inspired me to make this batch of Crab Stick Cream Cheese Tartlets. Now that the weather is getting really hot, they make a refreshing change from the usual baked quiches and tarts.

We came back from Alghero to an overturned BBQ and gas cylinder, overturned pots of plants etc. There must have been quite a wind storm during our absence. I spent the morning doing a few washes and today being a public holiday (Italy's Republic Day), the shops are closed so we'll have to make do with whatever we can find at home. Considering my tendancy to hoard, this is of course not a problem.

The rest of the family has gone off to play golf and later in the afternoon they will be swimming in the pool. I have alot of housework to catch up on, including preparing the guest room for MIL's coming month-long stay. Am I so behind in my chores...

Crab Stick Cream Cheese Tartlets :

1 packet Brisée or Puff Pastry
1/4 of a large Onion (chopped)
1 Garlic clove (minced)
A handful of fresh Coriander or Parsley (chopped)
100g Crab sticks/Surimi (chopped)
100g Philadelphia Light cream cheese
Juice of half a Lemon
2 Tsp grated Parmesan Cheese
Salt and Pepper to taste

Heat the oven to 180°C with an oven tray at the very top level and another one in the lower-middle shelf.

Bake the pastry tartlet shells à vide for 10 minutes on the lower shelf. The top tray will prevent the pastry from burning. Remove from the oven and set aside.

Chop all the ingredients finely and mix well with the lemon juice and cream cheese. Add salt and pepper to taste.

Scoop into the baked pastry shells just before serving.

vendredi, mai 21, 2010

Guacamole (Avocado Purée)

Guacamole
I am not a vegetable person and do not ever eat avocado - even though I have heard that song about how good it is for the skin. But I am not a dictator and do not discourage the rest of the family from eating it. In fact, I occasionally make Guacamole and serve it as a dip for tortilla chips or as part of a Fajitas meal.

How do I know what it should taste like? Well, I asked the Hub how he liked his guacamole and kept experimenting with different ingredients until he gave the thumbs-up for it. And I now have extra tasters in the Babies though it's difficult removing the bowl of guacamole from them once they start to dip their fingers in it.

I am making Fajitas this evening and have therefore prepared a guacamole. I liked the idea of doing something vegetarian today as I've just had a lovely Indian vegetarian lunch at KB's. Told myself that I would have to start checking out my vegetarian repertoire if I hope to invite some of those healthy vegetarians to my place for lunch.


Guacamole :

1 large ripe Avocado
1/4 Yellow Onion
Juice of 2 large Limes
1 Tsp ground Cumin
A handful of Coriander leaves
Half of 1 fresh Green Chilli
1 Tsp ground Chilli or a few drops of Tabasco
1 Garlic clove (optional)
Salt and Pepper to taste
Olive Oil to taste
2-3 Cherry Tomatoes (cubed)

Mix the avocado, onion, ground cumin, coriander leaves, chilli, salt, pepper, olive oil and lime juice till you get a paste. Smoothness is up to you.

Top with cubed tomatoes and serve. When I told Hub I was making fajitas for dinner, he said to put a bottle of Corona beer in the fridge.

mercredi, mai 19, 2010

Fried Fresh Anchovies (Alici)

Fried Fresh Anchovies
When we were living in Andalusia, I used to buy fresh sardines and anchovies from the local wet market at least twice a week. There are many ways to cook them, but I especially love them lightly dusted with corn flour and fried in olive oil.

I braved the rain this morning to make a trip to the supermarket and found some cleaned fresh anchovies and so decided to make a batch of Fried Fresh Anchovies for dinner this evening. Added curry powder and black pepper to the corn flour and dusted the fish in it before frying them in olive oil meant for frying.


They transported me back a little into time, I have missed those tapas moments when we would grab a few fried fish dishes and a few glasses of tinto de verano or sangria and sit outside, watching the children play and old folks gossip around us.